Wednesday, March 26, 2014

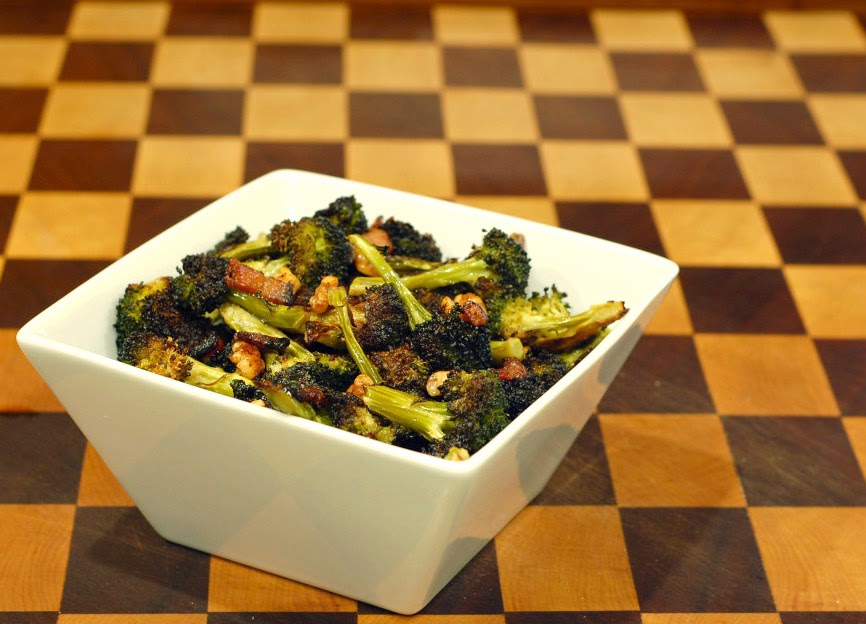
Bacon Broccoli

Ever get in a rut where certain foods just don't sound appetizing?  That was broccoli for me this fall/early winter.  Until I made this dish, which quickly become a weekly staple and go-to dish for sharing with friends.


Bacon Broccoli
adapted from Anna
serves 2-4

I don't measure anymore and the recipe is pretty forgiving, so if it looks like you need more bacon, use it (the thickness of slices can be deceiving).  Mix it up with cauliflower or brussels sprouts instead of broccoli.  Use pecans or pumpkin/sunflower seeds instead of walnuts.

8c broccoli florets
2-3T chopped walnuts
1 1/2t garlic powder
1/4t fine sea salt
~3T olive oil
3-4 slices nitrate-free bacon

Preheat oven to 400deg.

In a large bowl, combine broccoli, walnuts, garlic powder and salt.  Pour in olive oil and toss, adding enough oil so that the broccoli isn't dry.  Transfer to a cookie sheet (or two) so it's in a single layer.

Using scissors, cut bacon into ~1/2" slices and sprinkle over broccoli.  Bake, 30-40min, stirring every 15min.  Transfer to a dish and serve.


What's your favorite way to enjoy broccoli?

Monday, March 17, 2014

Old Forge Tri

{Please excuse my very belated race report... from 8/18/13}

Location: Old Forge, NY
Distance: Intermediate (1000m s, 22mi b, 4mi r)
Time: 8am
Weather: low 50s at the start (cloudy)
Total Participants: 219

Going into the race, I would be remiss not to mention that I was nervous for the swim.  I could count on one hand the number of times I had gotten into water during the summer.  Nevertheless, I jumped at the chance to spend a weekend with some of my favorite people (my family) and do some of my favorite things (swimming, biking, and running) in the Adirondacks!

Even though this race takes place in August, I had failed to recognize that by the third weekend in August, nights have already started to cool off up there.  I got to the race site early that morning so I could get a good parking spot and spend as long as I could in my car.  Brr.


Swim
Given the air temperature, it actually felt great to be in my wetsuit, and even to jump in the water.  It definitely took me awhile to calm myself down and settle my breathing (see above).  There were very few buouys, making it a little tough to sight on the angular course. I'm sure I didn't take the most direct route on the way out, I must've gotten into some sort of groove as I started passing people towards the halfway point.  It wasn't my fastest swim, but I had finished in 20:14 at 2nd in my AG.


Bike
There are some decent rollers in the front half of the course, but no crazy hills.  I got a boost as I was passing the all the tri bikes and aero bars.  And then I dropped my chain and they all passed me back.  Sigh.  I tried to be quick as I put it back on and pedaled along, distracted by the smell of breakfast being cooked in nearby homes (namely: bacon).  You're pretty much in the woods for the back half of the course, and it's pretty flat.  After enjoying the scenery, I pulled into transition in 1:18:37 (17mph).

must've been enjoying myself!
Run
I got off the bike with my legs feeling great, but quickly realized that I had to slow down.  I'm guessing I had an asthma attack (it's only happened once before in my life so it took me awhile to realize what was happening).  I walked a lot trying to get my breathing under control, and as frustrated as I was I tried to keep things in perspective and just enjoy where I was.  The turnaround had a great view, on a bridge over a river, and I started to jog slowly again.  I was able to keep it up for awhile longer and by the end of the race was able to pick it up, finishing in 36:35 (9:06 pace).


My focus on the beauty of the course paid off, as I wasn't complaining even after finishing with gas left in the tank.  It probably helped that I finished 3rd in my age group...  an unexpected end to the morning!

Me, Dad, Sweets

Clock Time: 2:18:50
AG 4/10
Overall 135/219

Mom & I

Tuesday, March 11, 2014

Apple Cinnamon Macarons

Every season (except winter) seems too short.  I always end up longing for the fruits of seasons long before they come around again.

I created these beauties to celebrate the fall, but since they use freeze dried apples you can enjoy them year-round.  The caramel sauce was a little thin for macarons even straight from the fridge, so perhaps using it to make a bourbon caramel cream cheese frosting would make for a better filling?

Oh, but wait!  I almost forgot.  YOU CAN MAKE CARAMEL IN THE MICROWAVE.  I know.  It blew my mind, too.


Apple Cinnamon Macarons with Salted Bourbon Caramel

190g almond meal
22g powdered freeze dried apples
212g powdered sugar
2t vietnamese cinnamon
82g & 135g egg whites, divided
354g sugar
237g water
Salted Bourbon Caramel Sauce, see below

Preheat the oven to 350deg and make sure the rack is in the middle of the oven.

Combine the almond meal, freeze dried apples, powdered sugar and cinnamon in a large bowl and whisk together to blend well and break up any clumps.  Make a well in the center of the dry ingredients. Pour in the 82g of egg whites and blend into the dry ingredients until evenly mixed, forming a thick paste.

Combine the 354g granulated sugar with the water in a small saucepan over medium-high heat.  Keep a candy thermometer attached to the side and be watchful! We're heating up the syrup to 248deg, but when it hits 200deg, begin whipping the 135g egg whites with a pinch of granulated sugar in a mixer on medium low speed.  Continue whipping the egg whites on medium speed until soft peaks form.  If soft peaks form before the syrup reaches 248deg, reduce the mixer speed to low to keep the egg whites moving.

Immediately remove the syrup from the heat when it hits 248deg.  Increase the mixer speed to medium and pour the syrup down the side of the bowl in a slow drizzle until fully incorporated.  Increase the mixer speed to medium-high and whip the meringue until stiff, glossy peaks form.

Add the meringue to the almond mixture in thirds, folding in each addition gently until smooth.  You may not use all of the meringue, so add it gradually.  The desired end-point is a smooth batter that runs in thick ribbons off your spatula.

Add the batter to a pastry bag fitted with a plain round tip with a 1/2" opening (or a ziploc bag with a corner cut off to a 1/2" opening).  Holding the bag perpendicular to the baking sheet, pipe rounds onto a parchment-lined baking sheet.  I find a template slipped under the parchment works well for even piping, just be sure to remove the paper before putting it in the oven!  Small peaks that you may see immediately after piping should smooth out if the texture of the batter is correct.

Transfer the baking sheet to the oven and immediately reduce the temperature to 325deg.  Bake for 9-12min, until the tops are smooth and set and feet have formed around the bottom.  Let the shells cool briefly on the baking sheet (~5min), and then peel them away from the parchment and place on a cooling rack.  They should come away easily and fully intact.  Repeat as needed with the remaining batter, replacing the parchment paper with each batch (I was feeling thrifty and used both sides) and bringing the oven temperature back up to 350deg before each batch.

Once the shells are baked and cooled, match them up in pairs by size.  To one macaron shell, add a bit of salted bourbon caramel sauce, then top with the paired shell.  Store in an airtight container in the refrigerator.  These get better with a little time in the fridge, so don't hesitate to make them a ahead of time.

Salted Bourbon Caramel Sauce
adapted from gimme some oven
yield ~1c

1c evaporated cane juice (or granulated sugar)
2T Lyle's Golden Syrup (or make your own sugar cane syrup)
2T water
1/4t fresh lemon juice
1/2c heavy cream, heated (I just warmed a bit
1T unsalted butter, softened
1t fleur de sel
1/4c bourbon vanilla (if you don't have any vanilla beans soaking in bourbon, just add 1/2t vanilla extract to your bourbon)

In a large glass measuring cup (or other microwavable bowl), add the sugar, sugar syrup, water and lemon juice.  Whisk together and cook on high for 5min.  Be careful not to overcook as it can burn!

Remove from the microwave and place on a kitchen towel.  Let cool for 3-5min, the color will deepen a bit more as it sits.

Begin by whisking in 1T cream, keep whisking as it will bubble and froth.  Continue whisking as you add in the rest of the heavy cream in a slow stream.  Finally, add bourbon, butter and salt, whisking well to combine.

Serve warm or transfer into a glass jar and let cool and thicken in the fridge.

Monday, March 3, 2014

Better Butters

Isn't it great when you re-discover something you already have and fall in love all over again?  Well, that has happened to me recently...  with my food processor.  It had taken a bit of a backseat to the Vitamix, but lately has been churning out delicious goodies at least once a week!

nuts and seeds

It all started when I finally broke down and tried Nutzo.  As delicious as it might be, I needed to come up with my own nut and seed butter that I could afford.  You could certainly play around even more with the combinations of nuts and seeds, but you'll find my go-to recipe below.


The next treat I discovered was coconut butter.  Coconut, toasted until a nice golden brown, then whirred in your food processor until creamy.  I usually add a pinch of salt, and would say that you should, too!  One batch also got some dark chocolate tossed in...  oh my.  This could take the place of dessert for me any day of the week.  You can find step-by-step pictures here.


Roasted Nut & Seed Butter
Yield ~2c

1c almonds
1/2c cashews
1/2c brazil nuts
1/4c pumpkin seeds
2T hazelnuts
2T ground flax seeds
2T chia seeds
1/2t fine sea salt

Preheat oven to 170deg.

Place almonds, cashews, brazil nuts, pumpkin seeds and hazelnuts on a cookie sheet and roast for ~5hrs.  If you want to remove hazelnut skins, you can do so easily after roasting, they slip right out.

While still warm, transfer nuts/seeds to the large bowl of a food processor.  Add remaining ingredients and blend until smooth, scraping down the sides of the bowl a few times.


If you're fortunate enough to have a food processor, what have you made in it lately??

Tuesday, January 21, 2014

Savory Cheesecake

I have come to love making jam so that I can enjoy the summer bounty in the depths of winter.  They are easily turned into dessert (pop tarts anyone?), but can also make a perfect party appetizer on top of cheesecake.

While an herbed savory cheesecake was a perfect base to my tomato jam before, I wanted more of a blank canvas for a batch of strawberry rhubarb caramelized onion jam that I made this summer.  Pumpernickel pretzels and walnuts turned out to be a fabulous choice for this treat, and it's absolutely perfect for entertaining. 

Although, if you don't want to share, I won't tell ;)


Savory Goat Cheese Cheesecake
adapted from my PB Chocolate Cheesecake

You can make this in a regular 9 or 10" cheesecake pan for a party, or perhaps a few smaller 4" pans for a smaller gathering.  Prefer the individual size?  A mini cheesecake pan or a muffin tin work as well.

1c pumpernickel pretzel crumbs (could use any type of pretzel or cracker here)
1/2c chopped walnuts (or other nut/seed)
4T butter, melted
12oz cream cheese, RT
11oz goat cheese, RT
1/4t sea salt
freshly ground pepper
3 eggs, RT
strawberry rhubarb caramelized onion jam, peach jam with caramelized onions and basil, or tomato jam

Preheat the oven to 350deg.

To make pretzel crumbs, grind up pumpernickel pretzels in the small bowl of a food processor.  Measure out 1c of the crumbs and combine with walnuts (these could also be ground up/chopped in the food processor).  Add melted butter and stir until well combined.  Press into desired baking pans.  Bake 7-10min, then transfer to a rack to cool completely.  Turn oven down to 250deg.

While the crust is cooling, prepare the filling.  Cream together cream cheese and goat cheese in a stand mixer.  Add salt and pepper and mix well.  Add eggs, one at a time, making sure each is well combined.  Pour into cooled crust, be sure not to fill more than 3/4 up the pan.  Tap cheesecake on the table to allow any air bubbles to come to the surface.

Bake (30min for minis, 45 for 4" and 1 1/2-2hours for a 9 or 10", the top will be set and no longer be jiggly). Remove and place on a wire rack.  Mine had cracks, but I didn't mind since I was covering it with jam. Once cooled, refrigerate until ~1hr before serving.  Top with the jam of your choice and serve!


I know we just passed the holiday season, what was your favorite party food?

Wednesday, January 1, 2014

Unblogged

While cleaning up my computer, I found some photos of recipes I had never shared here.  In keeping with the new year, I am going to share them now and start 2014 with a clean slate!


Black Bean Brownies

I haven't a clue what recipe I tried, but apparently it just wasn't quite as good as the real thing as they never made it to the blog.  Perhaps I'll stick to eating my beans everyday and keeping them away from desserts ;)


Chocolate Peanut Butter Cake

I actually have blogged about this cake before, but I adapted it a bit when making it to serve a crowd and it came out even better.  The entire 3 layers-worth of batter got baked into a sheet pan, creating thinner, more intense layers.  A bit of salted caramel sauce was drizzled in between the layers, and I finished off the bottom of the cake with some chopped honey roasted peanuts.  I was brought to tears the first time I tried to do this and swore I would never make it again, but it's happened two more times since then!


Fish Tacos

All I can remember about these is that they were delicious!  I signed up for the Cape Cod Fish Share for one season and these tacos were one of the delicious creations they inspired.  Looks like the fish was seasoned a bit and topped with cabbage, an avocado-citrus salsa and...  something creamy.  They were delicious, I wish I had written down the recipe!


Gingerbread Almond Butter Bars

For a gingerbread lover, I tried no less than three times to make gingerbread almond butter.  Each time it would look so creamy until I added the molasses.  And each time I ended up with a crumbly mixture whose only redeeming qualities was that it tasted good and could be formed into bars.


Peanut Butter Granola

I had some jungle peanuts around and thought they would look neat in some peanut butter granola. What do know, they do!  I think this was Lauren's recipe?


Pumpkin Granola Bars

These were good.  Really good.  They were an adaptation of a Smitten Kitchen recipe (I think this one), and I wish I still had this recipe!  There's a chance it's in a pile...  on the floor...  in the corner.  Maybe some day I'll have time to go through them.  Don't hold your breath.


Sweet Potato Vichyssoise

Another one of Lauren's recipes, this is a great recipe to have in your back pocket for when you have excess zucchini to use up in the summer!


Tomato Ice Cream

After my success with basil ice cream, I got the idea to try making a tomato ice cream using a technique I probably heard on the Splendid Table.  I even topped it with tomato jam!  But it just didn't do it for me.  Make tomato jam with your tomatoes instead :)


White Chicken Chili

Everyone's probably got a recipe out there for white chicken chili, and I tried one of them!  I don't think it was my favorite, so I will have to come up with my own- I hear a storm is coming, that's perfect chili making time.


What are you looking forward to in 2014??


Wednesday, December 11, 2013

Coconut Macarons w/Ganache

My intention was not to stop blogging for months...  how did it get to be December already?!?  I'm going forgo the excuses reasons and jump right back in with a cookie recipe I hope you'll enjoy.  As with most things, coconut is better with chocolate, and these macarons did not disappoint.


While you may not think of macarons as a traditional holiday cookie, I can't think of a day when I wouldn't want to eat one :)  And while they do require some time (they take me ~2hrs start to finish), one of the great things about macarons is that they are best made a day or two before you actually need them!


Coconut Macarons with Dark Chocolate Ganache
adapted from Annie's Eats & Chez Us
yield:  think I got about 70 using this template

There's no need to age egg whites when using this method, so once you have all your ingredients you can get to baking.

For the macaron shells:
106g almond flour
106g unsweetened coconut, finely shredded
212g powdered sugar
82 and 135g egg whites, divided
354g and a pinch of granulated sugar, divided
237g water

For the ganache:
200ml heavy cream
200g dark chocolate, chopped
1/2t cinnamon

Preheat the oven to 350deg and make sure the rack is in the middle of the oven.

Combine the almond meal, coconut and powdered sugar in a large bowl and whisk together to blend well and break up any clumps.  Make a well in the center of the dry ingredients. Pour in the 82g of egg whites and blend into the dry ingredients until evenly mixed, forming a thick paste.

Combine the 354g granulated sugar with the water in a small saucepan over medium-high heat.  Keep a candy thermometer attached to the side and be watchful! We're heating up the syrup to 248deg, but when it hits 200deg, begin whipping the 135g egg whites with a pinch of granulated sugar in a mixer on medium low speed.  Continue whipping the egg whites on medium speed until soft peaks form.  If soft peaks form before the syrup reaches 248deg, reduce the mixer speed to low to keep the egg whites moving.

Immediately remove the syrup from the heat when it hits 248deg.  Increase the mixer speed to medium and pour the syrup down the side of the bowl in a slow drizzle until fully incorporated.  Increase the mixer speed to medium-high and whip the meringue until stiff, glossy peaks form.

Add the meringue to the almond mixture in thirds, folding in each addition gently until smooth.  You may not use all of the meringue, so add it gradually.  The desired end-point is a smooth batter that runs in thick ribbons off your spatula. [Note: I made extra this time as the last time I tried a coconut batch they could've used a little extra meringue.]

Add the batter to a pastry bag fitted with a plain round tip with a 1/2" opening (or a ziploc bag with a corner cut off to a 1/2" opening).  Holding the bag perpendicular to the baking sheet, pipe rounds onto a parchment-lined baking sheet.  I find a template slipped under the parchment works well for even piping, just be sure to remove the paper before putting it in the oven!  Small peaks that you may see immediately after piping should smooth out if the texture of the batter is correct.

Transfer the baking sheet to the oven and immediately reduce the temperature to 325deg.  Bake for 9-12min, until the tops are smooth and set and feet have formed around the bottom.  Let the shells cool briefly on the baking sheet (~5min), and then peel them away from the parchment and place on a cooling rack.  They should come away easily and fully intact.  Repeat as needed with the remaining batter, replacing the parchment paper with each batch (I was feeling thrifty and used both sides) and bringing the oven temperature back up to 350deg before each batch.

While the macaron shells are cooling, prepare the dark chocolate ganache.  Add chopped chocolate into a bowl and set aside.  Pour cream into a small saucepan and heat over medium heat.  Once the cream comes to a boil, pour over the top of the chocolate.  Let sit for a couple of minutes, then stir until the chocolate has fully melted.  Add cinnamon and stir well.  Let sit in the refrigerator ~1hr before using to fill macarons.

Once the shells are baked and cooled, match them up in pairs by size.  To one macaron shell, add a layer of ganache, then top with the paired shell.  Store in an airtight container in the refrigerator.  These get better with a little time in the fridge, so don't hesitate to make them a ahead of time.


What are you baking up this holiday season?  Or perhaps what treats are you looking forward to receiving?

Thursday, September 26, 2013

Pickled Apples

This month the Creative Cooking Crew was creating...  pickles!


Embracing the cooler weather, I tried something a little different and tried pickling apples.  Since cheese goes as well with apples as peanut butter, I made some cheddar cheese crisps to act as a 'chip' for a salsa made from tangy pickled apples, crunchy walnuts, and fresh parsley.

Perfect for an upscale football snack or fun party appetizer :)


Cheddar Crisps with Pickled Apples

For the apples:
1/2c + 2T water
8T rice vinegar
3/4t kosher salt
1-2t local honey
2 sm-med apples
1t coriander seeds
1/4t black peppercorns

For the cheddar crisps:
cheddar cheese (I used an aged goat cheddar), finely grated
few stems of parsley, chopped
1-2T chopped walnuts

Heat water, vinegar, salt and honey in a small pot until honey dissolves.  Take off the heat, cover and let steep while you prepare the apples.

Julienne the apples and stuff into a jar (my apples may have been a bit large and filled a 16 and 8oz ball jar).  Add coriander and pepper to the jar, and then pour the brine over the apples.  Refrigerate at least 1 day before using.

Set aside some of the pickled apples to drain while you prepare the cheddar crisps.  Preheat the oven to 325deg and line a cookie sheet or baking stone with parchment paper.  Using ~2T of cheese, form circles on the parchment paper about 1" apart.  Bake for 10-12 min, until slightly browned.  Remove from the oven and let cool.

Once the cheese crisps are completely cool, transfer to a serving plate and top with the drained pickled apples and a bit of the chopped parsley and walnuts.


I imagine the pickled apple/walnuts/parsley combo would also go well on top of some baked brie.  Or tuck some pickled apples into a grilled cheese with sharp cheddar and black forest ham!

Who else has ideas on how to use the rest of my pickled apples?

Check out Foodalogue next week for more inspiration to get your pickle on!

Monday, September 16, 2013

Frosted Carrot Cake Bars

While my most recent cupcake adventure went quite smoothly, I did goof on one thing- way overestimating how much white chocolate whipped cream was needed. Don't get me wrong, I'm not complaining.  It went perfectly well with fresh-picked strawberries (as I had at the time, but it would go well with any fruit), but that only got me so far.

Enter these white chocolate whipped cream-topped treats: Carrot cake meets portability meets white chocolate.  Definitely a good reason to whip up a batch of white chocolate whipped cream, in case you needed one ;)


Frosted Carrot Cake Bars
adapted from Cookie Swap via use real butter
yield: ~2 dozen

These are best made ahead, as the white chocolate whipped cream melts on the warm bars and firms up a bit after a stint in the fridge.

for the crust:
1 1/2c whole wheat pastry flour (or AP flour)
2T evaporated cane juice (or granulated sugar)
1/2t salt
3/4c unsalted butter, softened and cut into T-size chunks

for the filling:
2 1/2T whole wheat pastry flour
1 1/4t cinnamon
1t ground ginger
3/4t ground cloves
1/2t salt
1/4t baking soda
14oz can sweetened condensed milk
2T unpacked dark brown sugar
2 large eggs
1 large egg yolk
1t vanilla extract
1 1/2c carrots, finely grated
1c pecans, lightly toasted and chopped
3/4c golden raisins
1/2c unsweetened coconut

for the topping:
1 1/2-2c white chocolate whipped cream

Preheat the oven to 350deg.  Line a 9x13 pan with foil, leaving 1" overhang around the edge of the pan.  Smooth out wrinkles and lightly coat with nonstick spray.

To make the crust, combine flour, sugar and salt in a food processor fitted with the metal blade.  Add butter and pulse until the mixture just starts to form a ball (15-20sec).  Transfer to the prepared pan and press evenly into the bottom.  Prick dough with a fork, then bake for 20-25min, or until lightly browned and firm to the touch.  Let cool on a wire rack for at least 30min.

In a small bowl, stir together the dry ingredients (flour, spices, salt and baking soda) and set aside.  In a large bowl, add the sweetened condensed milk, brown sugar, eggs, egg yolk and vanilla.  Whisk together until well combined.  Add the flour and whisk well, then stir in the remaining ingredients (carrots, pecans, raisins and coconut).  Pour the mixture over the crust and spread evenly.  Bake for 35-40min, or until the edges are caramel-brown.  Let cool on a wire rack.

While the bars are still slightly warm, add the whipped cream and spread evenly on the surface.  It will melt a bit, and that will aid in the spreading.  Once fully cool, transfer to the refrigerator overnight to allow the whipped cream to harden again.  If you need to serve these the same day you're baking, I would let the bars cool fully before adding any whipped cream.  Cut the bars and serve!


Monday, August 12, 2013

PMC 2013

The Pan-Massachusetts Challenge.

Photo Source

When I first heard about the event from Rachel, it sounded like something I wanted to be a part of.  I didn't quite realize how incredible it would be until last weekend.

The PMC is the largest athletic fund-raiser in the country.  Since it was founded in 1980, the PMC has raised $375 million for Dana-Farber Cancer Institute.  100% of rider-raised funds go directly to the Jimmy Fund.  That's pretty impressive.

Photo Source

Some riders have photographs pinned to their jerseys.  Other have ribbons pinned to their jerseys.  I even saw a "Why I Ride" list of inspiration on the top tube of their bike.  Everyone's lives have been touched by cancer.  Riding in the PMC is our way of doing something about it.

#committed
#closerbythemile
#forthosewhocannot
#theresalotridingonthis
#PMC2013

There were spectators, cheering us on, thanking us.  Thanking us?  I thanked them!  The signs that said "I'm here because of you", or "15 years old, 8 year cancer survivor" really tug at the heart strings.  And then we got to Lakeville, where we were greeted by Pedal Partners, children who are being treated or have undergone advanced cancer treatment at Dana-Farber.  Talk about inspiring.

Photo Source

Wellesley to Bourne
To be honest, I was so overwhelmed with the event, that I almost want to say the terrain was unremarkable.  There were a few short climbs but nothing too intense.  I had some cheerleaders at several water stops that gave me something to look forward to and helped me appreciate the extent of what we were doing this weekend.

the gang at DR-lunch stop

You meet some amazing people doing an event like the PMC.  I was lucky enough to cover many miles of training and the PMC with a special group of 'turkeys'.  Their company helped the miles fly by, and they made sure Sunday was extra special for me by serenading me with a few renditions of Happy Birthday!  I did find myself on open road sometimes, and my thoughts immediately went to everyone I was riding for.

My mom.
Grandpa.
Aunt Kathi and Aunt Carla.
Meghan's mom.
Mom & I
Joanne's dad.
Uncle Ted.
Louis.
Jack and Kay.
Barb.
David.
Bob and David.
Aunt Ange and Tony.
Karen.
Laura's dad.
Laurette.
Aunt Rose.
Ciocio Reggie.
Ciocio Mary.
John.


Sunrise in Bourne (Day 2)

Bourne to Provincetown
As we left Bourne Sunday morning, we were treated to a beautiful sunrise.  So gorgeous I had to stop for a picture!  The first part of the ride starts with some rollers.  Having friends waiting for me in Brewster helped get me through that first climb in Sandwich.  It gets easier for a stretch after that, with descents to match any ascents.  I found that pacelines were much more prevalent on day 2, and got more comfortable in them as the day went on.  At one point down Route 6 I was even leading a paceline!  Not sure how that happened, but I couldn't help but think I wanted to take a picture behind me :)

Check-ins along the way

As you get closer to the finish, you hit some more climbs in Truro that start to hurt.  My shoulder/neck started to give me some trouble here, but luckily enough the Welfleet water stop had a massage tent that helped ease some of my pain.  Nearing Provincetown, you have a chance to go to the "easy" way or the "fun" way to the finish line.  I chose to ride the dunes- the "fun" way, which included a few more hills and some great views.  Before I knew it I was rolling into the finish.


Finished!

My Stats
Miles Ridden: 163ish
Pace: 17ish mph

PMC Stats
Total registered riders: 5,534
33% Female
20% First-year riders
Average Age: 45
Participating states: 38
Participating countries: 7
Volunteers: 3,000+


I can't think of a better way to celebrate my birthday!

A huge THANK YOU to everyone who has supported my ride, I could not have done it without you.  I have raised $5010 to date.  There's still time to contribute- click here, every dollar counts.

Thursday, July 25, 2013

Stuffed

This month, the Creative Cooking Crew's challenge was to "Stuff it."


With the end of the month looming (where did the summer go?), I whipped up a "stuff it"-inspired meal: burrata-stuffed watermelon with a cucumber-mint salad as well as lamb burgers stuffed with goat cheese and sour cherry jam!


The creamy and salty burrata was a delicious counterpart to the crisp, sweet watermelon.  Cucumbers provided a nice little crunch, and the mint and serrano peppers rounded out the flavors.  The meal continued with a play on flavors and textures.  The juicy spiced lamb burgers paired well with the creamy goat cheese and sweet and tangy sour cherry jam.


Burrata-Stuffed Watermelon with Cucumber-Mint Salad
Recipe by Shannon

Stuffing the watermelon made for a fun presentation, but next time I'd just slice the watermelon and add burrata on top, followed by the cucumber salad!  Also- I debated making the cucumber salad with basil and adding some balsamic vinegar, think this would be another good option.

1 watermelon
1 ball of burrata
1 small cucumber, diced
1 serrano, finely diced
1-2 sprigs of mint, leaves removed
extra virgin olive oil
kosher salt
freshly ground black pepper

Cut off the watermelon rind to form a rectangular shape larger than the ball of burrata.  Slice diagonally down the center of the rectangle to form two halves.  Cut out a hole on the inside of each half that will fit the burrata.  Place the burrata inside the watermelon halves to re-form the rectangle.  Mine stayed together pretty well, but you could always use a toothpick or two to hold it into place.

To prepare the salad, add the cucumber, serrano and chopped mint to a small bowl.  Add a bit of olive oil, then season to taste with salt and pepper.  Add salad to a large plate and place the burrata-stuffed watermelon on top.  Slice and serve.


Lamb Burgers Stuffed with Goat Cheese & Sour Cherry Jam
Recipe by Shannon
Yield: 3 burgers

These could also be prepared un-stuffed, as burgers with a goat cheese spread topped with sour cherry jam/compote.

1lb ground lamb (or grass-fed beef)
2-3t Penzey's lamb seasoning
1-2oz goat cheese
2-3t sour cherry jam (recipe to come)
for assembly: burger buns, lettuce (I used swiss chard), or greek yogurt

Add the meat to a bowl and season with lamb seasoning, salt and pepper.  Mix lightly, then divide into 6 equal portions.  Form into small patties, then top three of them with a chunk of goat cheese and bit of jam.  Top with the remaining three patties and purse together.

On a hot grill, cook the burgers for 3-4min/side on high heat.  I served these on small brioche buns with some swiss chard- but feel free to dress up as you see fit!


What's your favorite thing to stuff??  As always, thanks to Joan and Laz for hosting!  Be sure to check out the recap with many delicious stuffed dishes!

Monday, July 22, 2013

Broccoli Arugula Pesto

You know when you are at the grocery store and you buy lots of food with grand plans to cook it all?  And then one thing leads to another and you wind up not having time to cook it all before it goes bad?

Yeah, it happens.

Luckily so did this pesto.  An abundance of arugula got whipped up into this delicious pesto- which extended its life a bit and allowed me to use it as the base for a few more meals!  This is a trick I'll have to remember :)

Some of this pesto was used as a sauce for some homemade whole wheat pizza dough, and got topped with grilled veggies and fresh mozzerella.  The rest got turned into the pasta dish below- both were fantastic! Check out Nosh On.It for other clever ways to use this pesto!


Broccoli Arugula Pesto
inspired by My Darling Lemon Thyme
yield ~4c

Feel free to scale back, or adjust the ingredients based on what you have on hand.

3 heads broccoli, cut into florets
6T cooking water
3-4c arugula (I bet other greens would work well here too)
2 small cloves of garlic
1/4c shredded cheese (could try nutritional yeast if you want to keep it vegan)
1/2c pumpkin seeds (or other nut)
~1/4c extra virgin olive oil
salt
freshly ground black pepper

Bring a large pot of water to a boil over medium-high heat.  Add a sprinkle of kosher salt and add broccoli.  Cook broccoli florets for 3-4 min.  Reserve ~1/2c cooking water and then plunge broccoli florets into a bowl of ice cold water.  Drain the broccoli and add to a blender or food processor.

Add cooking water, arugula, garlic, cheese and pumpkin seeds.  Blend, while drizzling in olive oil until you reach your desired consistency (I used about 1/4c).  Store in the refrigerator for a few days or freeze.


Broccoli Arugula Pesto Noodles with Shrimp and Goat Cheese
recipe by Shannon
Serves 4

1 pkg soba noodles (mine was 8.8oz)
1-1 1/2c broccoli arugula pesto
4oz goat cheese
1 pint grape tomatoes, halved
1lb uncooked frozen shrimp

Bring a large pot of water to a boil.  Salt the water, then add the soba noodles.  Cook pasta until al dente, adding in the frozen shrimp for the last 3 minutes of the cooking time.  My total cooking time was ~8min.  Reserve a bit of cooking water before you drain the pasta and shrimp.

[Whether or not you separate the shrimp from the pasta is completely up to you.  I did for picture and portioning purposes, but there's really no need.]

Add pasta back to the pot and add pesto and a few tablespoons of cooking water.  Mix until noodles are well coated, adding more cooking water if it looks dry.  Top noodles with goat cheese, tomatoes and shrimp.


Do you have a go-to use for food that's on it's last legs?

Tuesday, July 2, 2013

Red Velvet Cupcakes

I can't believe it's already been a month since I got to watch some pretty special people get married!  I think it's about time that I shared their second cupcake flavor-- Red velvet!  [the red cake + white frosting + blue wrappers...  totally acceptable for 4th of July celebrations ;)]


Now, I didn't grow up eating red velvet cake, so I didn't have a go-to recipe nor a good idea of what it should taste like.  Everyone seems to have their version of (aka the best) red velvet cake, so I had to test a few six out.  All cupcakes were topped with the same frosting in different designs and handed out to several taste-testers.  Man, was this tough!!  Luckily the bride and groom both agreed on their favorite- so we had a winning recipe.

from L: Joy the Baker/Hummingbird Bakery, Cook's Country (recipe here), Throwdown,
Smitten Kitchen, Cake Maven Raven (recipe here), Pinch My Salt

The true scientist I am, I had one more experiment to run.  The hypothesis: I can use a natural food coloring found in beets to achieve the traditional red velvet color.  I'll spare you the photos and explanations (it involves chemistry), but I tried two different methods and the results were clear:  no.  Before I knew it, it was time to start baking. Ugly brown cupcakes were not going to do it, so red food coloring it was.


With Rebecca's help, things went pretty smoothly and everything turned out well- I even had 5 minutes to get dressed before the ceremony started!  Ok, so I cut it a little close.  It was all worth it- these red velvet cupcakes were quite a hit :)


Red Velvet Cake/Cupcakes
adapted from Cake Man Raven bakery
yield: 1 8" 3-layer cake or 24 cupcakes

2 1/2c cake flour (how to measure flour)
1 1/2c evaporated cane juice or granulated sugar
1t baking soda
1T natural cocoa powder (I used Hershey's, do not use dutch-process)
1t sea salt
2 eggs
1 1/4c vegetable oil
1c buttermilk
1oz red food coloring
1t vanilla extract
1t white distilled vinegar

Preheat oven to 350deg.  Spray 3 8" cake pans with nonstick baking spray or line 2 cupcake tins with wrappers.

Add sugar and salt to a medium bowl.  Sift flour, baking soda and cocoa powder into the bowl.  Whisk dry ingredients together.

In the bowl of a stand mixer, beat remaining (wet) ingredients with the paddle attachment until well combined.  Add the dry ingredients and beat until smooth, ~2min.

Divide batter evenly between cake pans or use a large cookie scoop to evenly distribute between cupcakes. Bake until a toothpick inserted in the center comes clean, 15-18min for the cupcakes or 25-30min for the cake.  Let cool 5 min, then remove cupcakes from the pans onto a cooling rack.  For the cake, invert onto a plate and then invert back onto the cooling rack.  Let cool completely before frosting.


Cinnamon Cream Cheese Buttercream

1 1/2 sticks (12oz) butter, RT
1 1/2 pkgs (12oz) cream cheese, RT
1 1/2t vanilla extract
1.5lbs powdered/confectioners sugar
2 1/4t cinnamon

Whisk together powdered sugar and cinnamon.

In the bowl of a stand mixer, cream together butter and cream cheese until light and fluffy.  Add vanilla and blend until combined.  Add the powdered sugar and beat until smooth (start off slow to avoid getting sugar all over the kitchen, then speed up to incorporate well).

Can be made ahead and refrigerated, just bring to RT before using.


Which would win you over- red velvet or strawberry shortcake cupcakes??  I had to try both...
Related Posts Plugin for WordPress, Blogger...
Blogging tips